Scanning documents and photos from your Canon printer to your computer can be a surprisingly simple process. In this all-encompassing guide, we will lead you through a variety of methods and offer valuable tips for effectively scanning from your Canon printer to your computer.
Whether you’re utilizing a Canon Pixma TS, TR, MX, or MG model, we’ve got you covered with the expertise to make the task of how to scan from a Canon printer to a computer a seamless experience.
How to Scan on Canon Printer
Before we immerse ourselves in the intricacies of scanning, it’s crucial to determine whether your Canon printer boasts scanning capabilities. Although numerous Canon printers arrive with the inherent ability to scan, it’s not a universal feature across all models. To confirm whether your particular Canon printer model supports scanning, adhere to these guidelines:
Refer to Your Printer Manual: Start by consulting your printer’s user manual. Locate the “specifications and features” section, where you should find information about scanning capabilities.
Visit the Canon Website: Navigate to the official Canon website and use the search bar to find your printer model. The product page should provide details on whether scanning is supported.
As a general guideline, most Canon “all-in-one” printers are designed to handle scanning tasks in addition to printing and copying. If your printer falls into this category, you should have scanning capabilities at your disposal.
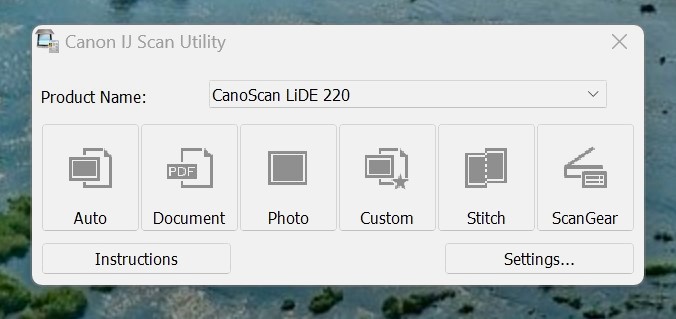
How to Scan to Computer with Canon IJ Scan Utility
Canon’s IJ Scan Utility is a user-friendly software program that streamlines the scanning process, making it a breeze. It ensures compatibility and offers customization options for your scanning needs. Follow these steps to scan using the IJ Scan Utility:
Step 1: Download and Install IJ Scan Utility
The IJ Scan Utility is compatible with both Windows and macOS, making it versatile for users of different operating systems. To download it, follow these steps:
- Visit the Canon Downloads Portal.
- Enter your printer’s product name and select your operating system.
- Get the right drivers for your printer, and also download the IJ Scan Utility.
- Run the installer and follow the on-screen instructions to install the software on your computer.
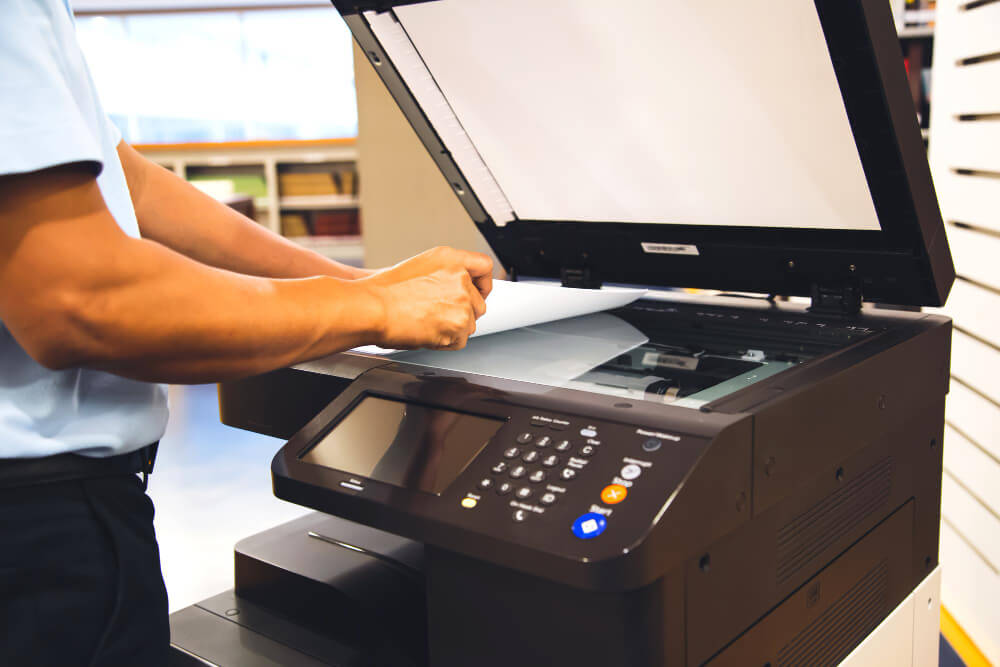
Step 2: Align Your Document for Scanning
When you’ve finished installing the IJ Scan Utility and it’s working, put the paper or picture you want to scan on the flat glass part of your Canon printer. This spot is usually at the to of the printer and is marked with arrows indicating proper alignment.
Ensure that the side of the document or photo you want to scan faces downward on the scanner bed, and if needed, close the scanner lid to secure the document in place.
Step 3: Adjust the Settings Before Scanning
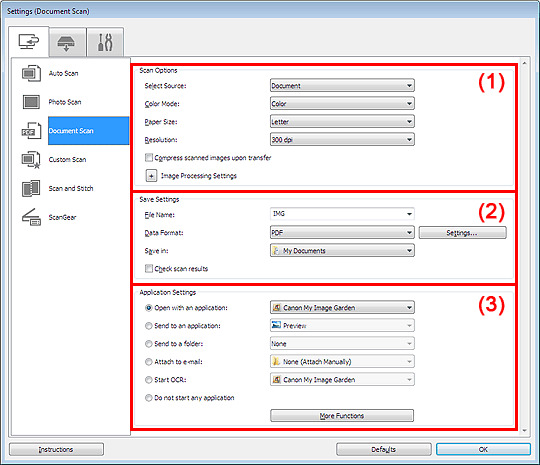
To open the IJ Scan Utility, initiate a search for it on your computer, and then adhere to these instructions for tailoring your scanning preferences:
- Locate the “Settings” tab situated in the lower-right corner of the window.
- Opt for the “Document Scan” tab to gain access to a variety of scanning configurations.
- Modify parameters such as the designated storage location, file format, resolution, color adjustments, paper dimensions, and more to align with your specific needs.
- Confirm your selections by selecting “OK,” which will save your adjustments and return you to the main interface.
Step 4: Scan Your File
With your settings adjusted, you’re ready to initiate the scanning process:
From the main interface of the IJ Scan Utility, choose whether you want to scan a document or a photo.
- Click on the corresponding tile to initiate the scanning process.
- If needed, click on “Custom” to specify the size and number of items to scan.
- After making your selection, wait until the scanning is done.
- The scanned files will be kept where you told the scanner to save them when you set it up.
- The IJ Scan Utility offers a seamless scanning experience, eliminating compatibility concerns and allowing you to customize your scans to your liking.
How to Scan from Canon Printer to Computer Without Apps or Utilities (Manually)
If you prefer not to install additional apps or utilities on your computer, you can still scan from a Canon printer using the built-in scanning features of your operating system. Here’s a manual method to scan:
Step 1: Ensure All Printer Drivers Are Up to Date
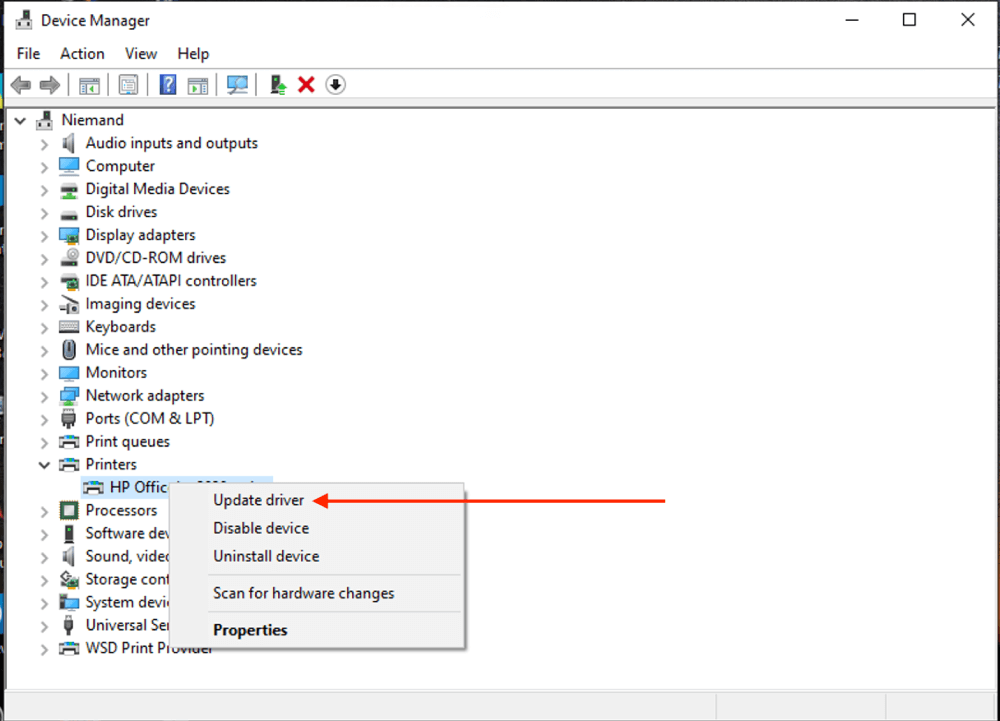
Before you proceed, ensure that your Canon printer drivers are up to date. You can update your printer drivers using the driver CD that came with your printer or by visiting the Canon Driver Portal on their official website.
Step 2: Prepare Your Document for Scanning
Put the paper or picture you want to scan on the flat part of your Canon printer where you scan things. Make sure the side you want to scan is facing down and lines up correctly with the arrows on the scanner bed.
Step 3: Use Built-in Scanning Features on Your Computer
Most modern computers come equipped with built-in scanning features that enable you to scan directly from your Canon printer. Follow the steps below based on your operating system:
For Windows:
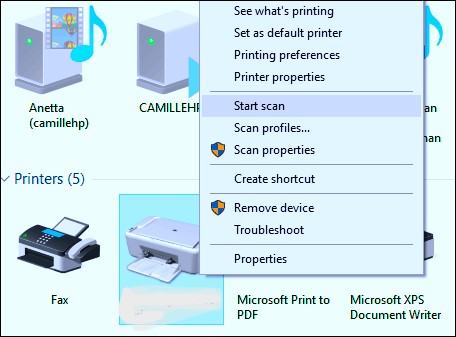
Search for “Devices and Printers” in the search bar and select the corresponding result.
Locate your Canon printer model and right-click on it.
Choose “Start scan” from the context menu to begin the scanning process.
For macOS:
Search for “Fax and Scan” in the search bar and select the corresponding result.
In the new window that pops up, click on “New Scan” located in the top-left corner.
Choose your Canon printer model from the options provided and click “OK.”
Step 4: Adjust the Image Before Scanning
Once you have accessed the scanning interface, you’ll have the option to adjust various settings before scanning the document or photo. These options could be about things like paper size, what kind of file you want, the colors, how clear it should be, and how bright or dark it looks. Change the settings the way you like them.
Step 5: Conclude the Scanning Procedure
Once you’ve fine-tuned the settings, start scanning by pressing the ‘Scan’ button. Your computer might ask where to put the scanned file, depending on how it’s set up. Follow the directions on your screen to finish scanning.
This manual approach enables scanning without the necessity of adding extra software, providing a convenient choice for certain users.
Troubleshooting Common Scanning Issues
While scanning from your Canon printer to your computer is generally straightforward, you may encounter common issues from time to time. Here are some troubleshooting tips to address these issues:
Issue 1: Scanner Not Detected
If your computer fails to detect the scanner, try the following steps:
- Ensure that the printer is properly connected to your computer via USB or Wi-Fi.
- Turn off your printer and computer, and then turn them on again.
- Make sure you have the newest printer drivers.
- If you can, think about using a different USB port or cable.
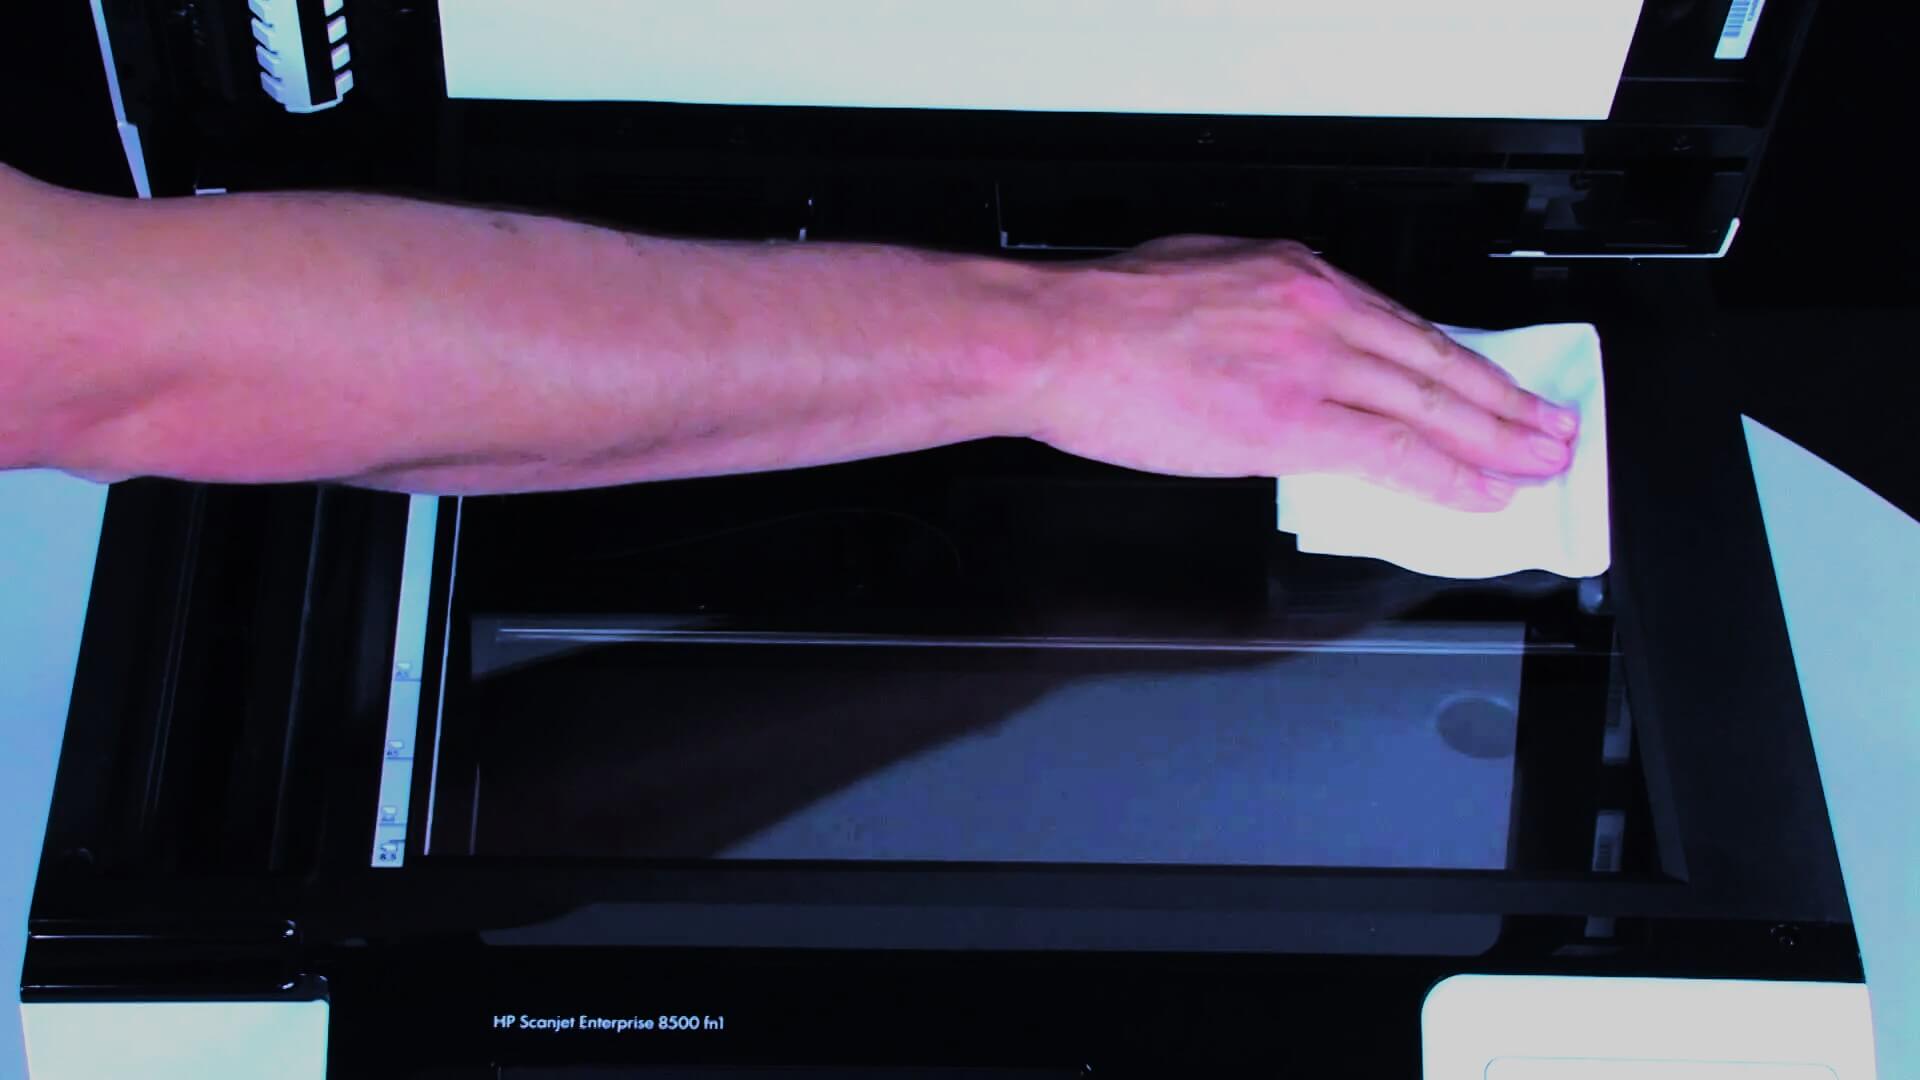
Issue 2: Blurry Scans
If your scans appear blurry, consider these solutions:
- Clean the scanner bed and the glass surface to remove any dust or dirt.
- Make sure the paper or picture is flat and lined up correctly on the scanner bed.
- If you want clearer scans, change the resolution settings to a higher number.
Issue 3: Scanned Files Too Large
If your scanned files are excessively large, you can try the following:
- Lower the resolution settings to reduce file size.
- Compress the scanned files using file compression software.
- Switch to a more efficient file format, such as JPEG instead of TIFF.
Issue 4: Scanned Documents Cut Off
If your scanned documents appear cut off, take these steps:
- Check the paper size settings in the scanning software to match the actual document size.
- Adjust the placement of the document on the scanner bed to ensure the entire document is scanned.
- Resize the scanning area as needed to accommodate larger documents.
Tips for Optimal Scanning Results
Below are the most effective tips for optimal scanning.
1. Regularly Clean Your Scanner Bed
To maintain top-notch scan quality, clean the scanner bed and glass surface regularly to remove dust, fingerprints, and smudges that can affect scan clarity.
2. Preview Scans
Many scanning applications and utilities offer a preview function. Use it to review your scan before finalizing it, ensuring that the document or photo is properly aligned and that the settings are satisfactory.
3. Organize Your Scanned Files
Establish a consistent file-naming and storage system to keep your scanned documents and photos organized. This will make it easier to locate and manage your files in the future.
4. Experiment with Settings
Feel free to experiment with scanning settings such as resolution, color settings, and file types to find the optimal configuration for your specific scanning needs.
5. Maintain Driver Updates
Keep your printer drivers up to date to ensure compatibility and access to the updated features.
Conclusion
Scanning documents and photos from your Canon printer to your computer becomes a straightforward and efficient endeavor when you adhere to the steps elucidated in this guide. Whether you opt for the convenience of the Canon IJ Scan Utility or lean towards manual scanning methods, you are now equipped with the expertise to approach this task with assurance.
Troubleshooting insights and optimal practices further enhance your scanning experience, ensuring the attainment of superior outcomes. Proficiency in the realm of scanning with your Canon printer unveils a realm of possibilities for the digitization and management of your documents and images. Revel in the convenience and adaptability that scanning imparts to your everyday tasks, all while mastering how to scan from your Canon printer to your computer.
Leave a Reply