If you’re like most office workers, you rely on your printer to get through the bulk of your day. Your printer is one of those essential pieces of equipment that you often take for granted- until it stops working! To ensure optimal performance from your machine and keep it in top condition, all parts must be kept clean and well maintained.
This includes the waste toner cartridge – an overlooked but integral part of a thriving office environment. Over time, the toner collects in this cartridge and needs to be emptied to ensure continued printing functionality. But fear not,
In this blog post, we will explore how to empty your waste toner cartridge in 4 easy steps – so you can rest assured knowing everything’s running smoothly! Keep reading to find out more…
Safety Checks To Take Before Emptying Your Waste Toner Cartridge
Before emptying your waste toner cartridge, it’s important to take certain safety checks to ensure that the process is carried out safely. Take a look:
- First and foremost, ensure that the printer is turned off and unplugged
- When you remove the waste box, avoid directly breathing into the toner as it contains harmful contents
- Also tries to minimize exposure to toner as it can affect your skin
- If the cartridge appears to be in good condition, use a vacuum cleaner specifically designed for toner dust to remove the toner from the cartridge
- Ensure that the waste toner cartridge is securely in place before turning on the printer
By following these simple yet crucial safety checks, you can avoid any potential risks associated with emptying a waste toner box.
Steps To Remove Toner Waste Cartridge Box
If you own a Brother printer, you may be wondering if can you empty a Brother waste toner box rather than replace it. The answer is yes, you can empty it, and it’s an affordable alternative to buying a new cartridge. To empty your waste toner cartridge, there are four easy steps to follow.
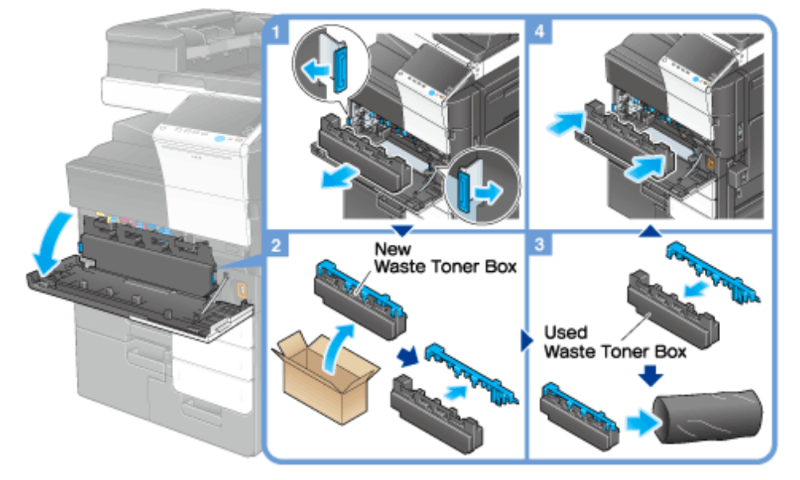
1. Open The Printer Cover And Locate The Waste Toner Box
When it comes to maintaining your printer, emptying your waste toner cartridge is an essential step in ensuring that your printer continues to function properly. To begin this process, you’ll need to open the printer cover and locate the waste toner box.
This box can typically be found behind the access door, and it collects any excess toner that is produced during the printing process.
Once you’ve located this box, you can move to the next step. It’s important to take care during this process, as the toner can be messy and potentially harmful to breathe in.
Note: Depending on the model and type of the printer, the waste cartridge location might vary.
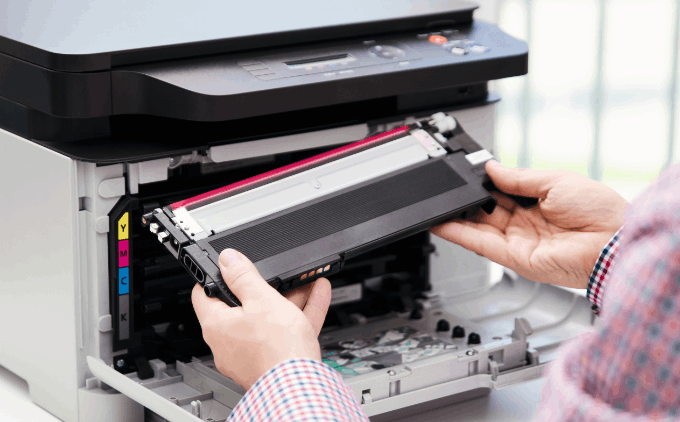
2. Remove The Waste Toner Cartridge
Once the waste toner cartridge is full, it must be properly removed and disposed of to ensure that your equipment continues to function optimally.
To remove the cartridge, start by unplugging the printer and opening the machine’s front or side panel. There, you will see the toner cartridge you print with and the waste toner cartridge that we need to remove.
To remove the waste, use the instructions in your printer’s manual to release it from its slot. When you remove the waste toner box, Inspect the cartridge for any damage or signs of wear and tear. If the cartridge appears damaged, do not attempt to empty it, instead dispose of it immediately.
Note: Be sure to dispose of the waste toner cartridge per local regulations
3. Dump Waste Toner Cartridge Directly Into Your Garbage Bag
Properly maintaining your equipment’s waste toner cartridge is essential to keep your printing and copying operations running smoothly. So, the third step of emptying your waste toner cartridge is to dump the waste toner directly into the garbage bag.
It would be best to use a garbage bag with a sealable top to prevent any spills. In case of any spills, use a microfiber cloth or any other soft cloth to clean it up. Avoid using any cleaning agents as they might damage the printer.
4. Clean The Waste Cartridge Box And Put It Back In The Printer
Now that you have removed the waste toner cartridge from your printer and disposed of the excess toner, it’s time to move on to the final step.
To clean the box, you will need to carefully remove any remaining toner, preferably using a vacuum cleaner and a soft brush, taking care not to damage the box or any of the internal components.
Also, you can use a microfiber cloth or any other soft cloth to clean the inside of the waste toner box. Ensure that there is no leftover toner on the cleaning cloth. Once the box is clean, you can simply place it back into the printer and continue printing as usual.
Note: It’s important to note that you should never reuse the waste toner from the box as it can cause damage to your printer.
By following these simple steps, you can ensure that your printer will continue to function properly and produce high-quality prints for many years to come.
Conclusion
The waste cartridge box is the container that collects all of the unused toners from the printing process, and over time it can become full and cause your printer to stop working properly. Emptying your waste toner cartridge is a simple process. However, it requires a certain level of technical knowledge. By following the four easy steps mentioned in this blog post, you can empty your waste toner cartridge safely and effectively. Proper care of your printer’s waste toner box ensures smooth and long-lasting printer performance. So, make sure you take some time to empty and clean your waste toner box periodically and keep your printer in good shape.
Leave a Reply