 There was a time when people only used their printers for printing photos when they wanted a good laugh. The reason was that printing photos on printers of those times made the colours poor, the image pixelated, and the picture just weird.
This was a time when printing photos was something that was only done by professional printing services because they owned specialised photo printers.
However, the trends are different now. While a lot of people still go to the local photo printing service providers, a few own specialised photo printers that they use for printing their own photos, on their own time, at their own cost.
If you print photos frequently, then it can turn out to be cheaper to print your photos yourself than use a photo printing service provider. The only problem is that you need to learn how to prepare photos for printing.
Why Is It Important To Learn How To Prepare Photos For Printing?
Printing photos is obviously not like printing text. In text only a small percentage of the page is covered while in photos the whole page is covered. Moreover, in text only a small range of colours is used (i.e. if you use coloured text in the first place), while in photos the spectrum of colours used is vast.
The reason why we’re explaining something simple like the difference between printing photos and printing text is that the differences affect the process. For instance, when you print text, you know that it’ll look like it does on the screen. This isn’t the case with photos.
A printed photo will never look the same in print as it does on your monitor, unless you take steps to ensure it. This is where learning how to prepare photos for printing becomes important. While formal training is important for learning how to prepare photos for printing like a pro, understanding the basics is a good place to start. The following are some of these basics.
Resolutions and Sizes Are Connected
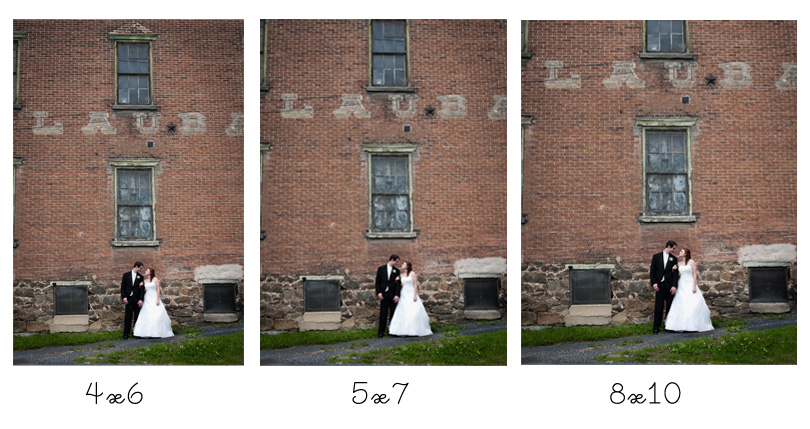
![]() There is a close relationship between the resolution of your photo and the maximum size to which it can be printed. In simplest of terms, higher resolutions mean that larger photo sizes are possible.
There is a close relationship between the resolution of your photo and the maximum size to which it can be printed. In simplest of terms, higher resolutions mean that larger photo sizes are possible.
As important as this is the fact that higher resolutions create better looking photos. This means that knowing the relationship between resolutions and photo sizes is an important aspect of learning how to prepare photos for printing.
If a photo has a high resolution, then it turns out to be crisper and clearer. In contrast, if a printed photo is unclear and pixelated, then the size you’ve picked for the photo is too large for its resolution. It’s not possible to change the resolution of a photo after it has been taken.
The only way you can change resolution of a photo is before you take it. If you plan on printing the photos you are taking, then it might be a good idea to increase the resolution of the camera. This is especially pertinent if you want to print the photo to a large size.
Aspect Ratio Must Be Considered While Cropping
 You can’t always control the composition of the photos you take. Sometimes, random cars, animals, garbage, flying debris or even a photo bomber can get caught in the frame.
Sometimes, a photo turns out to be ‘picture perfect’ except for this one element on the boundary of the frame. In such situations, you need to pull out your photo cropping tool from the digital toolbox and get chopping.
It’s good to crop away dross and garbage while you prepare photos for printing but you need to remember one very important thing. You can’t change the aspect ratio of the photograph while cropping it from what you intend to use while printing it.
In simpler words, if there’s a specific aspect ratio that you want to print at then you need to keep it the same while cropping the image. Messed up aspect ratios caused by cropping can result in the printed photo being stretched on the page or its edges going beyond the page’s edges.
It’s always a good idea to keep your cropping tendencies in check because too much cropping can also affect the resolution of the photo as you try to keep the aspect ratio same.
Printer Resolution Cannot Be Lower Than 300 DPI
 So, you’ve considered the actual resolution of the printer and cropping parameters. Now, it’s time to look at your photo printer while you prepare photos for printing.
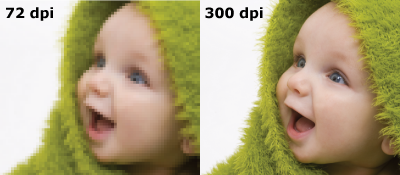
Your printer has a resolution setting too. It is measured in DPI or Dots per Inch. DPI defines the density of dots in every inch of paper.
It tells the printer how much coloured ink it should put in an inch sized space on the paper. Before you print your photo, you need to ensure that its DPI setting is, at the very least, 300 DPI. Anything below the 300 DPI mark will make the photo look crappy unless it’s incredibly small as well.
You can, of course, take the DPI setting to as high as you want. However, keep in mind that the higher the DPI setting is, the more ink your printer will be using. In other words, the more expensive your photo will turn out to be.
Calibrating Monitor Is Crucial To a Good Photo Print
 Everything mentioned above is the absolute basics. You can treat it like the dummies version of how to prepare photos for printing.
Still, if you’re serious about printing your own photos, then you need to know about colour spaces. Colour space is the range of colours that a device uses to display photos and images.
In your situation, you’re using your monitor and your printer. The colour spaces used by your monitor and your printer are completely different.
You can see the difference between these two colour spaces as the difference between kilometres and miles. Your monitor uses the RGB colour space. This colour space mainly consists of Red, Green, and Blue shades of colours or colours in the range of Red, Green, and Blue. Of these, most monitors are setup more towards the blue shades.
Your printer, on the other hand, uses CMYK colour space. This colour space consists of Cyan, Yellow, Magenta, and Knockout (another way of saying black). The primary reason why your printed photos look different from how they looked on the monitor is this difference in colour spaces.
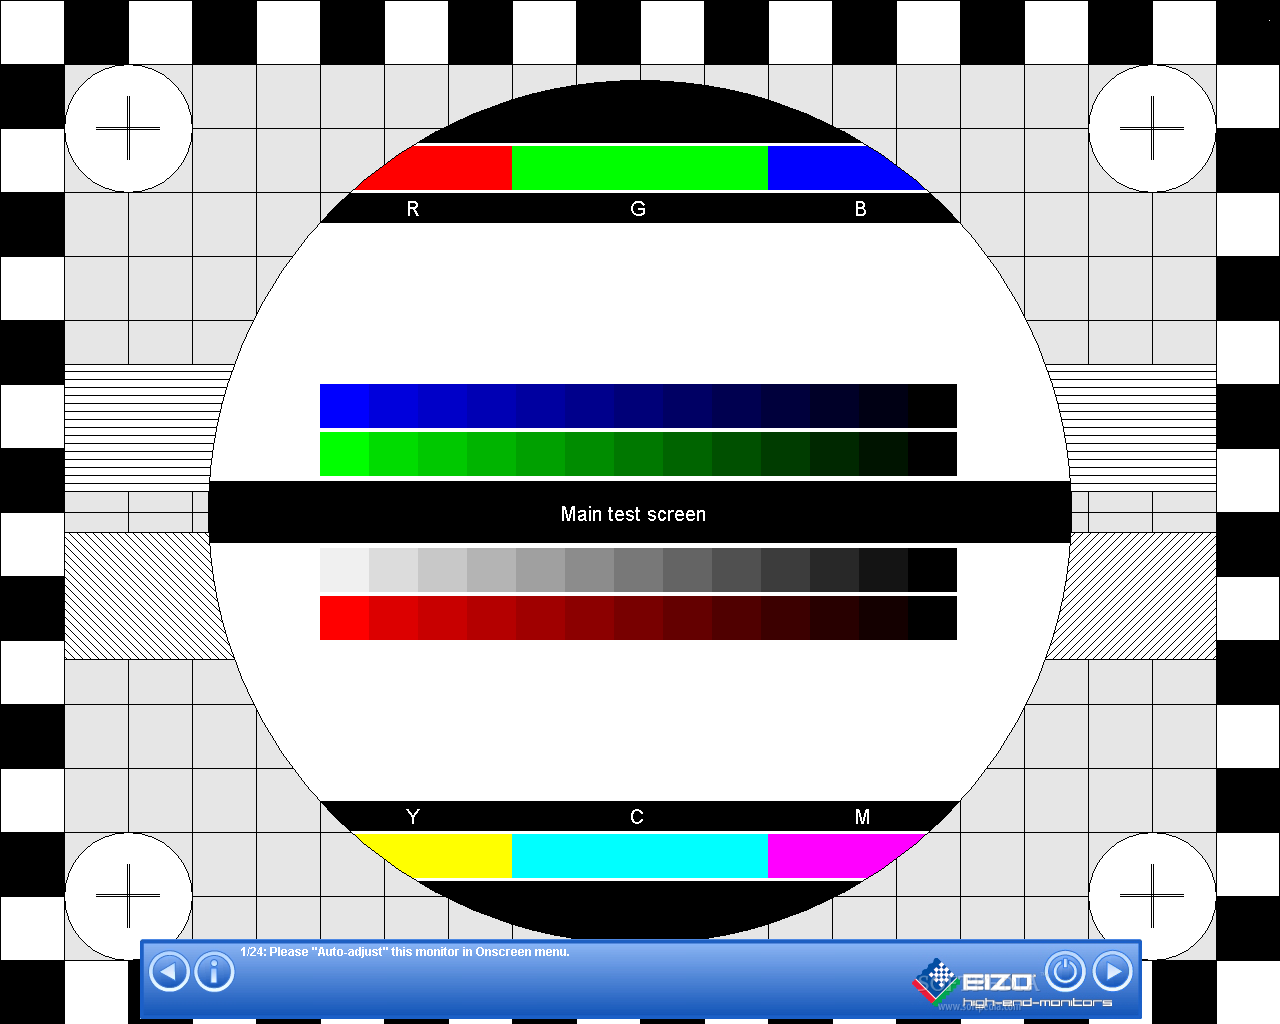
In order to deal with such a fundamental discrepancy, you’ll need to undertake two steps. The first is to calibrate your monitor. Ever monitor operates with a specific colour profile. This colour profile changes according to the setting as well as the age of the monitor.
In fact, every few days, the colour profile of your monitor changes slightly. This is why calibrating your monitor’s colour profile is important if you want to prepare photos for printing.
There are free software programmes that you can use to calibrate your monitor. Examples of such programmes include Eizo Monitor Test and Calibration Aider. You can download these programmes, follow the instructions, and they’ll automatically calibrate your monitor for you.
If your monitor is calibrated, then you just need to make sure that the colour profile of your photo is CYMK when you prepare photos for printing. This will ensure that it looks like the way it will be printed before you actually give the print command.
Leave a Reply