How to replace HP 564XL and 920XL Ink Cartridges
STAGE 1:
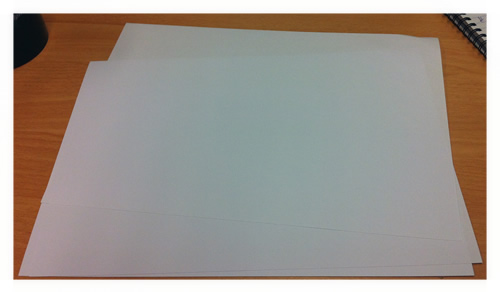
1. Clear some space on a work bench. >
2. Place some sheets of blank paper on work
bench as pictured on the right.
STAGE 2:
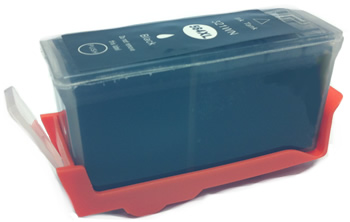
1. Remove Ink cartridge from its packaging.
2. Remove the plastic wrapping.
3. Place ink cartridge on sheets of paper workspace
made in stage 1
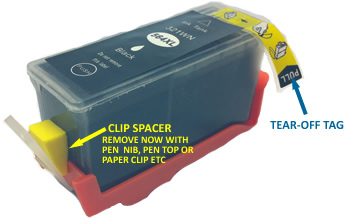
4. Do NOT remove orange cartridge holder cradle yet!
5. Locate CLIP SPACER as pictured and remove.
NB If there is no CLIP SPACER go to step 6.
6. Locate Tear-Off Tag as shown.
STAGE 3:

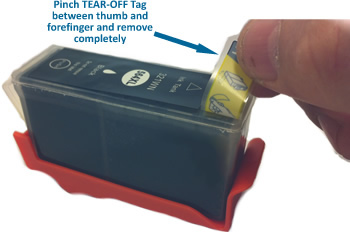
1. Place thumb under vacuum TEAR-OFF TAG as above
2. Pull off TEAR-OFF TAG slowly and gently by pinching the tag between thumb and forefinger.
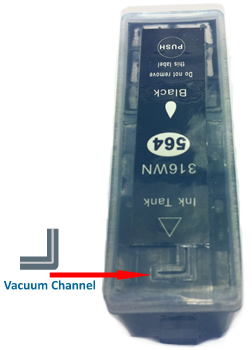
3. Once tag is removed examine the vacuum channel as above to ensure no residual parts of the Tear-Off Tag are remaining which may cause an air-flow blockage resulting in blank prints.
4. IMPORTANT: If there is residual tear-off tag or adhesive left in the vacuum channel, then a vacuum will not form and ink will fail to flow, resulting in blank prints.
5. NOTE: Use a sharp instrument to remove any such obstructions in this channel. If in doubt, remove the top label in its entirety.
STAGE 4:
1. After ensuring vacuum channel is clear, place back upright as above. NB: Ensure you are still working on the sheets of paper on the workbench from Stage 1
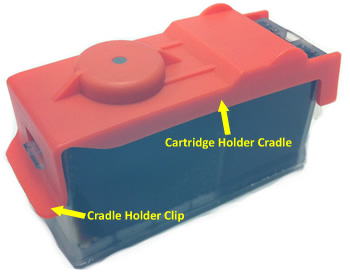
2. Turn Ink Cartridge upside down and observe the location and design of the Cradle Holder Clip and the Cartridge Holder Cradle.
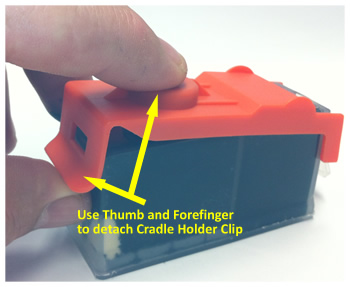
3. Use thumb and forefinger to lever to un-clip the the Cartridge holder Cradle as above.
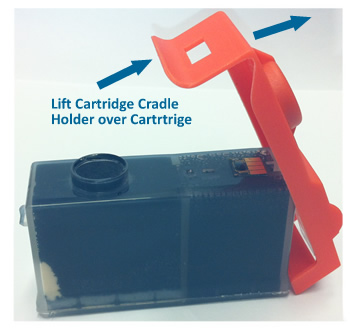
4. Lift Orange Cartridge Cradle Holder over to the right of ink cartridge.
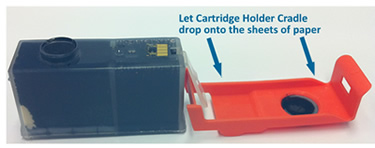 5. Allow Orange Cartridge Cradle Holder to fall onto the sheets of paper on the work space.
 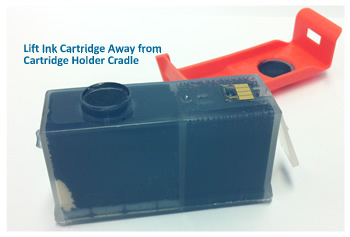 6. Lift ink cartridge up ,and away from Orange Cartridge Cradle Holder and place back on sheets of paper on work space.
STAGE 5:
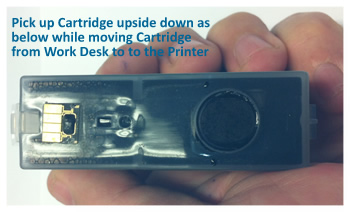
1. Pick up cartridge from workspace with palm of hand ensuring always that you are carrying the cartridge upside down as above and as you move towards the printer. This is to prevent any ink from spilling out before reaching the printer space and cartridge carriage in the printer
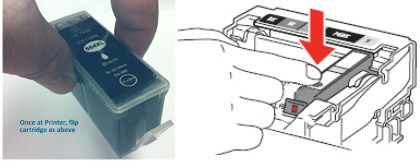
2. Once at printer, flip cartridge back over above the printer cartridge carrier section as per above and then slide and clip the ink cartridge into place as above. NB: Always install cartridge so that the plastic clip of the retaining clip is facing towards the front of the printer into place. Install cartridge to printer with a firm click. If the press of the cartridges does not produce a firm click sound, remove and bend clip tag out slightly and then refit.
STAGE: 6 COMPLETION FAQ'S
1. Once cartridge/s have been fitted to the carriage, close printer door and wait for the printer to cycle ink through tube lines.
2. Once printer goes into standby, then undertake a test print to ensure all colours and cartridges are working. If its clear that the cartridge that has just been replaced is producing streaky or blank prints, then undertake a print head clean as documented in your printers manual and then try again.
3. If the print head clean fails to remedy the streaky prints, then it well maybe that ink has failed to flow down ink tubes or the print head itself has failed in this particular area where this particular colour is emitted.
IMPORTANT NOTE: To assist with diagnosing whether the fault is due to a faulty print head or simply because the ink has failed to flow, please immediately do the following.
Remove cartridge and re-check vacuum channel for obstruction by referring to instructions in step 3 of STAGE 3 of this document above. If after checking and making any remedies here, prints are still blank, then tube lines will need further re-priming. Click HERE and download the corresponding colour/s primer pattern. Print two prints of the page of the colour of the cartridge that is producing the streaky/blank lines and then inspect pages for ink deposits. If page is completely blank, then the most likely cause of the failure is the print head itself has worn out. The print head, like cartridges do eventually wear out and need replacing. Often though the cost of a new print head cost more than a new printer. If this is the case with your printer, then naturally the best course of action would be to purchase a new printer.
If there is ink on the page, then return to normal printing, ensuring that a print head clean is undertaken regularly at least once per week
4. If printer fails to reach standby, then check the messages on the printer screen on PC screen or both. It may well be that another cartridge is also empty and so if this is the case, then retrieve the appropriate colour cartridge and return to Stage 1 above to complete the fitting procedure.
Copyright(c) 2009 Inkjet Wholesale


 Ink Cartridge Wholesale Carton Packs