If you have to print documents often, picking which machine will do the job each time is a hassle. Even if you print only a few documents at a time, many people might use your computer to print. This can slow things down.
That’s where default printers come in. By changing your computer settings, you can choose which printer your computer will use from now on. And so you won’t have to pick it up again!
In this blog, you’ll explore how to set default printer on a Windows 10 computer. We’ll also take you through how Windows can manage your printing.
Why Setting a Printer as Default is Important?
If you’ve just gotten a new computer or changed networks, you’ll notice that your computer asks you which printer you wish to use. This happens whenever you try to print a document until you select a default device or let Windows manage this setting.
Before selecting a default device, you must understand what this setting means. When you make a printer your default, your computer automatically chooses it for all your scanning and print jobs. Therefore, your computer will no longer ask you which printer you want to use. It will just pick the printer you’ve already approved as a default.
This setting is particularly helpful if you often print using the same machine. It reduces the time wasted if you print often. And for those using public or shared computers, it reduces the risks of someone unfamiliar with the system picking the wrong printer. Because, as an administrator, you can select the printer everyone will use.
How to Set Printer to Default Mode?
Now that you understand how this setting works, let’s go through the steps to ensure your preferred printer is the default.
1. Go to Start
To make your printer the default choice, you first need to go to the home button. On Windows 10, this button looks like four squares in the lower left corner of your screen. Alternatively, you can press the Windows key near the bottom left of your keyboard.
2. Enter Your Settings
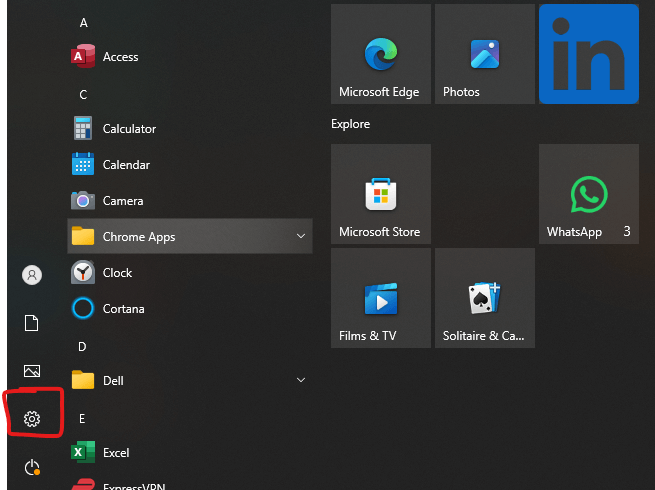
Once you have reached ‘home’, you will find a ‘Settings’ button. It looks like a gear. Another way you can reach the Setting is by pressing the keys ‘Windows’ and ‘I’ together.
3. Click on Devices
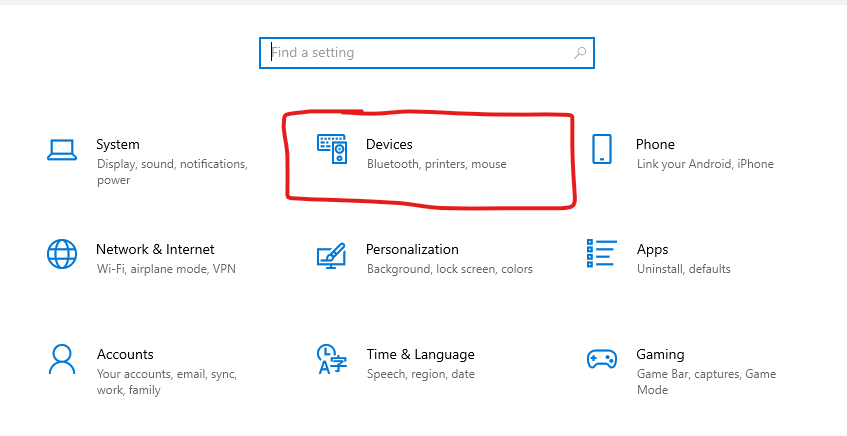
In ‘Settings’, you’ll find a list of features of your computer. Among them, there’ll be ‘Devices’. This is where you will find all the devices connected to your computer. Click on ‘Devices’ so that you can find your printer settings.
4. Go to Printer and Scanners
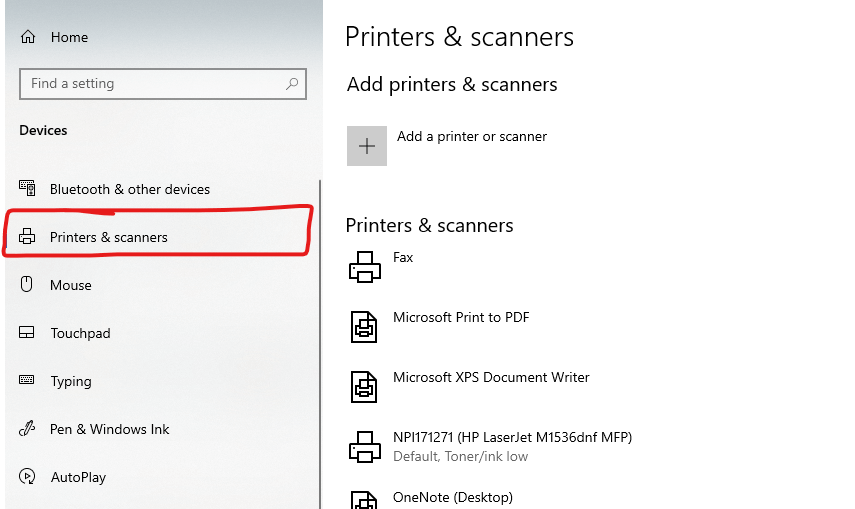
Now that you’re inside ‘Devices’, you need to click on ‘Printers and Scanners’. You’ll spot it on the left of the screen.
5. Unselect Automatic Default Printer
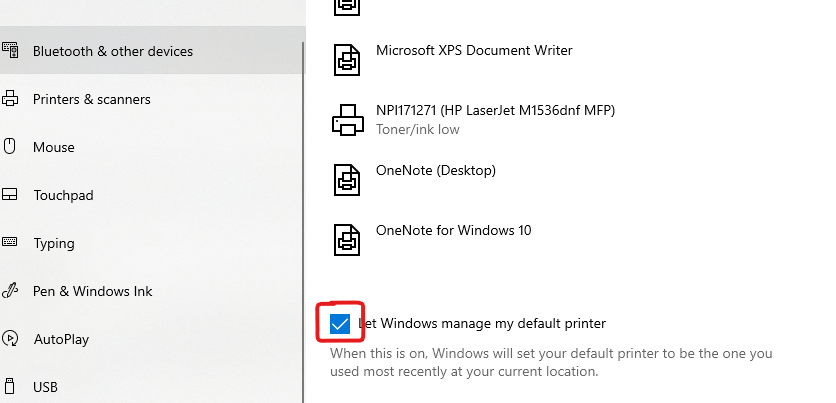
When you’re in ‘Printers and Scanners’, you’ll see a list of your machines. Additionally, there’s the option: ‘Let Windows manage my default printer’. If you’ve selected this setting, your computer will pick the printer. Therefore, you need to unselect this setting.
6. Select the Printer You Want
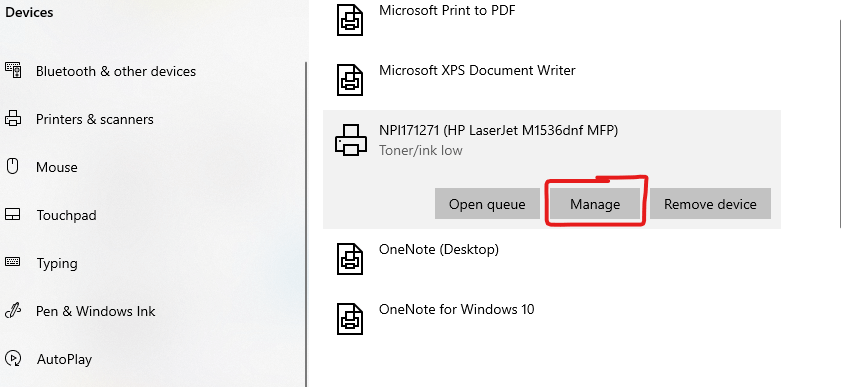
Once you’re sure Windows isn’t managing your printers, you can select the one you prefer. Then, click on ‘Manage’.
7. Make Your Printer the Default
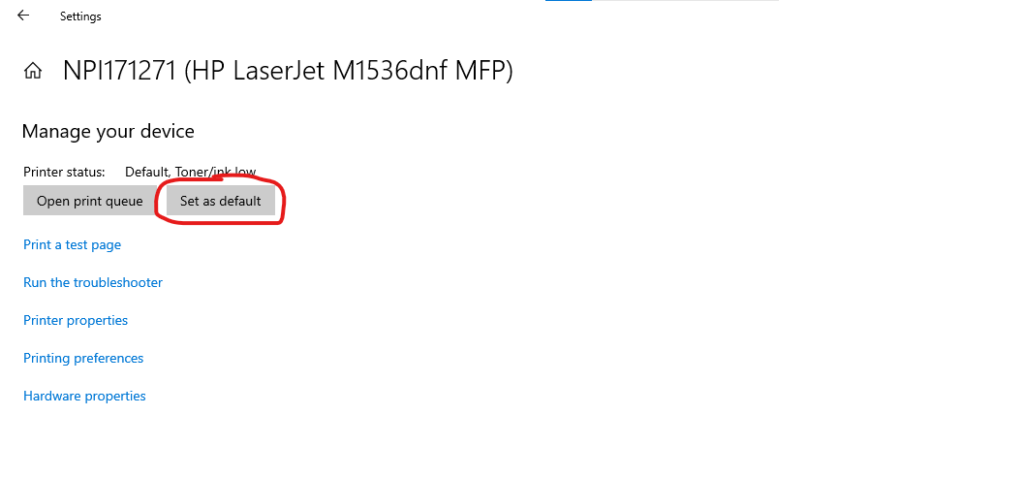
After you have clicked on ‘Manage’, you’ll have the option to make it a default. Select that option, and you’re done!
If you want to check that you’ve correctly changed your settings, check your printer’s status. Now your printer doesn’t need a ‘Set as Default’ option as it’s already the default.
How to Set Default Printer for All Users?
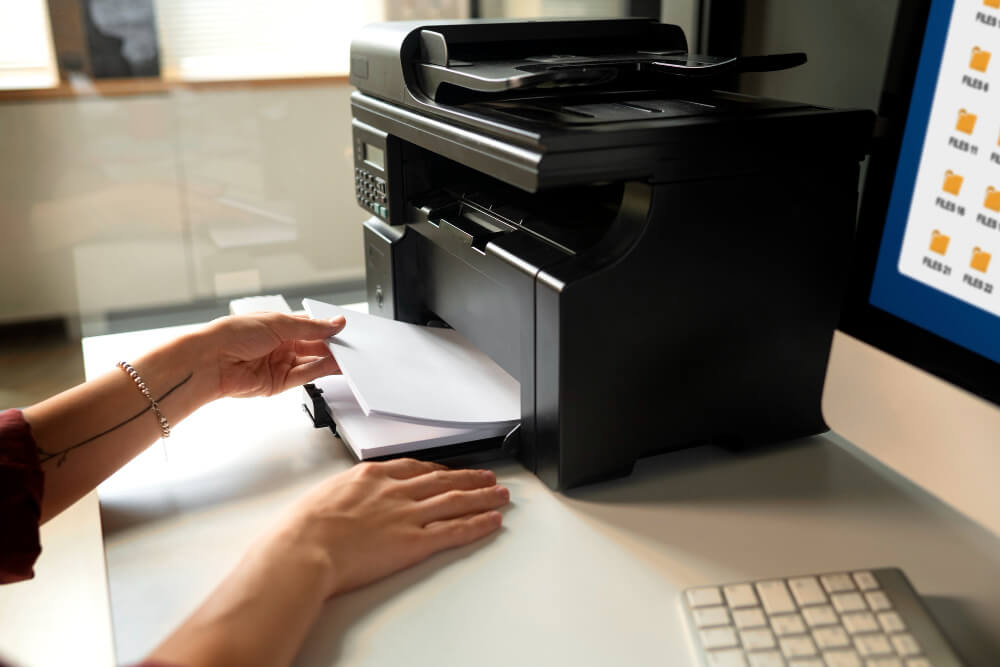
If you have multiple accounts on the same computer, you don’t need to repeat the above steps multiple times. Instead, you can set the default machine just once.
1. Go to Printers and Scanners
To ensure all user accounts have the same machine enabled as the default, go to Start/Home. Press the Windows key or click on this button at the bottom of your screen. Then, select the gear-shaped ‘Settings’. Next, you’ll need to click on ‘Printers and Scanners’.
2. Click on Printer Properties
As you are now in the printer settings, you should select the machine you desire. This will give you the option to ‘manage’ your printer. Once you’ve clicked on your machine, you’ll see ‘Printer Properties’.
3. Select the “Advanced” Tab
In your machine’s properties, you’ll find this tab. In the ‘Advanced’ section, there are more of your printer’s settings – including the option to set it as a default.
4. Change Your Settings
Once you’re inside the ‘Advanced’ tab, click ‘Printing Defaults’. There, you’ll select the printer your computer will always choose, no matter who signs in.
How to Automate Printer Selection?
If you want your computer just to pick the printer you just used, you need to let Windows choose the printer you’ll use. Here’s how you can automate your printer choice:
- Go to Start: To make Windows automatically pick a printer for you, go to the Start/Home button. It’ll look like the Windows logo, and you can go to it via your keyboard or by clicking the bottom left of your screen.
- Click on Settings: Once you’ve gone to ‘Start’, you need to select the gear-shaped button. It’ll open the settings.
- Go to Printers and Scanners: After you go to settings, you’ll need to click ‘Printers and Scanners’.
- Select Windows Management Option: Now that you are in ‘Printers and Scanners’, select ‘Let Windows Manage my Default Printer’.
Windows will automatically choose your printer for you. It will make this choice based on the printers you’ve used before.
Recap
Now that you know how to set default printer, making a printer your preferred choice for all print jobs isn’t difficult. As you have seen in the steps above, all you need to do is go to your settings, find your printer, and make it a default.
By setting your preferred printer as default, you avoid the hassle of choosing a printer every time. You can also apply this change to all accounts on your computer. However, if you prefer your computer to select the last used printer, you can enable the option that lets Windows manage your printer.
Leave a Reply